Customizable Form
Customize Warranty Registration Forms to Fit Your Business.
Customizable Forms

How to Create a Warranty Registration Form That Fits Your Business

With WiNG, you can create flexible and customizable warranty registration forms that match your business needs. To design an effective form, here are some key guidelines and best practices to consider

Define the Purpose of Your Form.

Start by clearly identifying the purpose of the form. Since this is a warranty registration form, think about what information is truly necessary from the customer.
Only request details that are essential for Identifying the buyer, Verifying the product or service and Approving the warranty.
Asking for too much information can discourage users from completing the form, especially if it feels time-consuming. Be mindful of customers’ privacy and always comply with PDPA or other applicable data privacy regulations.

Product Management and Grouping

(Available for Standard and Pro plans)
The product list in your warranty system helps customers select and register the item they’ve purchased. You don’t need to list every SKU like a POS system. Instead, focus on product categories or models that differ in warranty terms.
Example: If both clear and matte films come with a 1-year warranty, you can group them under one product name like “Protective Film” to make selection easier.
However, if you offer highly specific products that require individual tracking for claims, you should include a Serial Number field. For added convenience, you can even embed product details directly in a QR Code attached to the product.
Customizable Forms Customizable Forms

Choose the Right Field Types

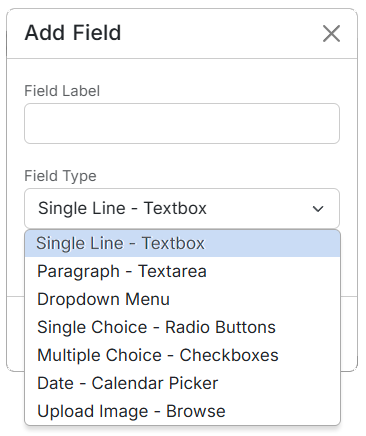
WiNG supports a wide variety of field types to help you collect exactly the information you need. Common field types include:
• Single Line (Textbox): For short inputs like name, phone number, license plate.
• Paragraph (Textarea): For longer responses like address or additional notes.
• Dropdown Menu: For single-choice selections like product model or purchase location
• Single Choice (Radio Buttons): For one-answer questions like gender or membership type
• Multiple Choice (Checkboxes): For questions with multiple possible answers, such as “How did you hear about this product?”
• Date (Calendar Picker): For dates like birthdate or purchase date
• Upload Image (Browse): For uploading receipts or product photos
Note: WiNG doesn’t limit the number of fields you can add.
However, please keep in mind that fields like image uploads can consume your “Photo/File Storage” quickly if overused.

Required Fields

Mark Required Fields Thoughtfully

Only mark a field as “required” if the information is truly essential—such as data used to verify the buyer or identify the product.
Avoid requiring information that customers might not have, as this may lead to incomplete forms or inaccurate entries. The goal is to collect quality data without adding friction to the registration process.
Key Fields

What Are “Key Fields” in WiNG?

Key Fields allow you to search and identify individual registrations on the admin backend. You can define up to three Key Fields, which should contain unique identifiers, such as National ID number, Membership code or Vehicle license number
You can rename Key Fields by clicking the pencil icon and updating “Key 1–3” with your preferred field labels. These fields are especially helpful when managing a large customer database.

Test Before Publishing

Before launching your form, we recommend testing it yourself 2–3 times to ensure a smooth user experience. During testing, consider
• Is the form easy to complete?
• Are all inputs saving correctly?
• Are there any unnecessary fields?
• What is the overall feel from a customer’s perspective?
Note: Submissions made through the Preview screen are treated as real entries and will count toward your transaction quota based on your subscription plan.